Añadir remitente y aprobadores al flujo de trabajo de submittal
Objetivo
Añadir un remitente y aprobadores al flujo de trabajo de submittal para un submittal.
Contexto
Al crear o editar un submittal, puede añadir dos (2) tipos de usuarios (también conocidos como "roles") al flujo de trabajo de un submittal:
- Remitente
- Aprobador
Un aprobador designa a las personas que deben aprobar el submittal antes de que el trabajo pueda continuar. Normalmente, hay varios aprobadores en un flujo de trabajo de submittal y miembros del equipo de diseño (por ejemplo, arquitecto, ingeniero de proyectos, ingeniero de estructuras, etc.).
Temas a considerar
- Permisos de usuario necesarios:
- Para añadir usuarios al flujo de trabajo de submittal para un submittal creado por usted:
- Permisos de nivel "Solo lectura" o "Estándar" en la herramienta Submittals del proyecto con el permiso pormenorizado "Crear envío" habilitado en su plantilla de permisos.
O BIEN - Permisos de nivel "Estándar" en la herramienta submittals del proyecto sin una plantilla de permisos asignada.
Nota: Sin permisos de nivel "Administrador" en la herramienta Submittals del proyecto, solo puede añadir usuarios con permisos de nivel "Administrador" en la herramienta Submittals del proyecto al flujo de trabajo de submittal.
- Permisos de nivel "Solo lectura" o "Estándar" en la herramienta Submittals del proyecto con el permiso pormenorizado "Crear envío" habilitado en su plantilla de permisos.
- Para añadir usuarios al flujo de trabajo de submittal para un submittal que no ha creado:
- Permisos de nivel "Estándar" en la herramienta Submittals del proyecto y debe habérsele designado como gestor de submittals.
- Para añadir usuarios al flujo de trabajo de submittal para cualquier submittal:
- Permisos de nivel "Administrador" en la herramienta Submittals del proyecto.
Nota: Con permisos de nivel "Administrador" en la herramienta Submittals del proyecto, puede añadir al flujo de trabajo de submittals usuarios con permisos de nivel "Estándar" o superior en la herramienta Submittals del proyecto.
- Permisos de nivel "Administrador" en la herramienta Submittals del proyecto.
- Para añadir usuarios al flujo de trabajo de submittal para un submittal creado por usted:
- Información adicional:
- Si su empresa piensa añadir un Remitente de otra empresa al submittal, se recomienda designar un gestor de submittals como primer aprobador en el flujo de trabajo de aprobación secuencial del submittal. Esto le da al gestor de submittals la posibilidad de asegurarse de que el equipo interno revise minuciosamente el submittal antes de enviarlo a los aprobadores siguientes (p. ej., el equipo de diseño) del paso del flujo de trabajo.
Pasos
- Aplicar una plantilla de flujo de trabajo de submittal a un submittal
- Añadir usuarios al flujo de trabajo de submittal
Aplicar una plantilla de flujo de trabajo de submittal a un submittal
A user with 'Admin' level permission to your project's Submittals tool can create one (1) or more submittal workflow templates which you can then to a new submittal when you first create it. This saves data-entry time by preventing you from having to add a new submittal workflow each time you create a submittal.
- Under Submittal Workflow, do the following:
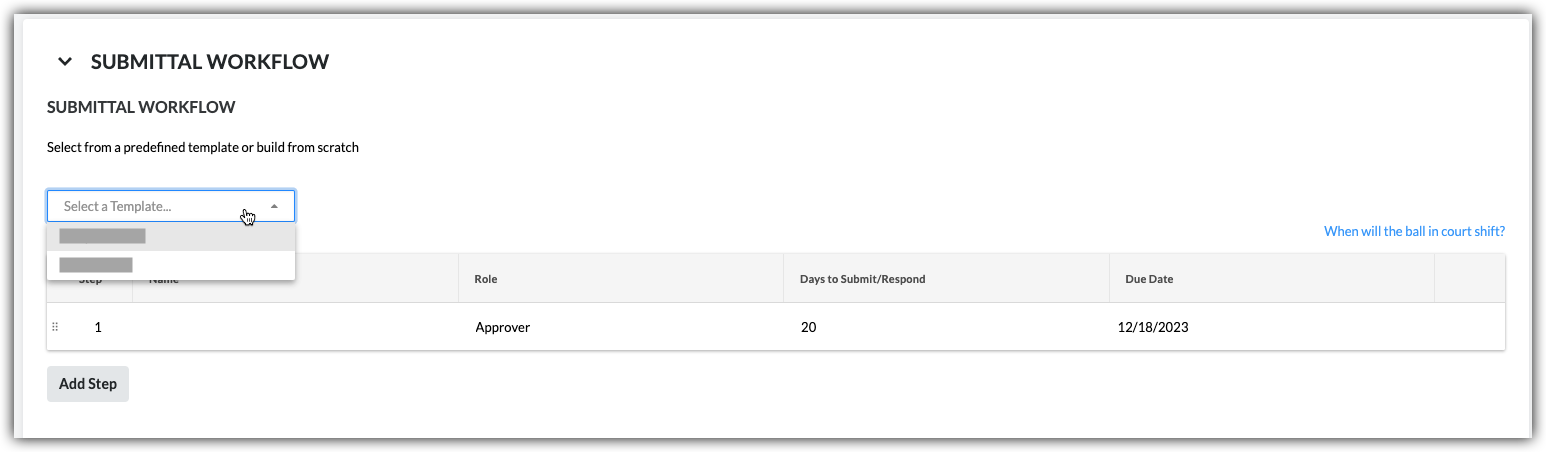
- Select a Template. Select a workflow template from the drop-down list.
Notes:- This drop-down list is only visible and available to users with 'Admin' level permission on the Submittals tool.
- This action applies the person(s) named on the submittal workflow template to your submittal.
- To learn how submittal workflow templates are created, see Manage Submittal Workflow Templates.
- Select a Template. Select a workflow template from the drop-down list.
- Continue by modifying the Name, Role, and Days to Submit/Response fields as needed for the submittal. Your changes only affect the workflow on the submittal, your changes do NOT affect the submittal workflow template.
- (Optional) Continue with the steps in Add Users to the Submittal Workflow.
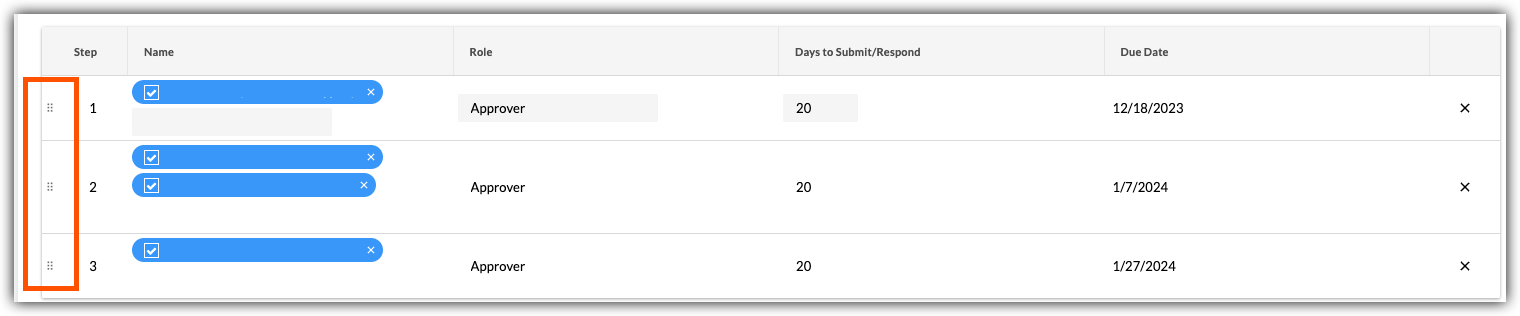
Añadir usuarios al flujo de trabajo de submittal
- Under Submittal Workflow, do the following for each desired line item in the submittal:
- Name. Start typing a project user's name in the Search box. Then select the appropriate user from the list.
- If you want to require a response from the user, place a mark in the checkbox next to their name.
OR - If you do NOT want to require a response from the user, remove the mark from the checkbox.
Note: If you are adding more than one user to a parallel approval workflow group, the Ball In Court Responsibility will shift to the next workflow group after all of the people marked required in the group submit a response to the submittal.
- If you want to require a response from the user, place a mark in the checkbox next to their name.
- Role. Select Approver or Submitter from the list. See What is the difference between a submitter and approver in submittals?
Notes:- To be designated as an approver, the person must exist in the Project level Directory tool (see Add a User Account to the Project Directory) and must also be granted 'Admin' or 'Standard' level permissions to the Submittals tool (see Set User Permissions for the Submittals Tool).
- If you are a user with 'Standard' level permissions to the Submittals tool, you can only add users with 'Admin' level permissions to the workflow.
- If you plan to add a Submitter to the submittal, we recommend that you designate a Submittal Manager as the first approver in the submittal's sequential approval workflow. This gives the Submittal Manager an opportunity to ensure the submittal is thoroughly reviewed by your internal stakeholder before it is sent to the users in the next step on the submittal workflow.
- If you are a user with 'Admin' level permissions to the Submittals tool, you can add users with either 'Admin' or 'Standard' level permissions to the workflow.
Note: If you want the submittal workflow to use sequential approval, add only one user to each line item in the workflow. If you want a step in the submittal workflow to use parallel approval, add two or more users to a line item.
- Due Date. Select a date from the calendar for the submittal response to be due.
Note: The 'Due Date' field is automatically populated based on the default number of days specified on the Submittals tool's Configure Settings page. See Configure Settings: Submittals Tool. The due date also respects which days are set as 'working days' for the project. See Set Project Working Days.
- Name. Start typing a project user's name in the Search box. Then select the appropriate user from the list.
- Click Add Step.
- Repeat these steps to add another user to the workflow.
- If you want to change the order of the workflow steps, do the following:
- Grab the line item by the vertical grip (⋮⋮).
- Use a drag-and-drop operation to move the line item into the desired order.
Consulte también
If you would like to learn more about Procore's submittals management software and how it can help your business, please visit our construction submittals software product page  .
.