Crear una POC de contrato principal a partir de un evento de cambio
Objetivo
Para crear una orden de cambio potencial para un contrato principal a partir de un evento de cambio.
Contexto
Si su empresa ha configurado su proyecto para que utilice una estructura de orden de cambio de dos (2) niveles, el proceso de evento de cambio requiere que cree una posible orden de cambio. A continuación, creará la OCCP a partir de la herramienta Contratos principales. Al crear un POC, el desglose de partidas se rellenará con los valores de los últimos precios.
Temas a considerar
- Permisos de usuario necesarios:
- Permisos de nivel "Estándar" o superior en la herramienta Eventos de cambio del proyecto.
Y - Los permisos de nivel "Estándar" en la herramienta Contratos principales del proyecto y la opción de configuración "Permitir a usuarios de nivel estándar crear POC" deben estar habilitados en la herramienta Contratos principales. Consulte Ajustes de configuración: Contratos principales.
- Permisos de nivel "Estándar" o superior en la herramienta Eventos de cambio del proyecto.
- Información adicional:
- Dependiendo del ajuste de configuración del nivel de órdenes de cambio configurado para la herramienta de Contratos Primarios, las posibles órdenes de cambio pueden pasar a uno (1) de los siguientes elementos:
- Para las órdenes de cambio de dos (2) niveles, una orden de cambio de contrato principal glossary-of-terms#Prime_Contract_Change_Order .
- Para las órdenes de cambio de tres (3) niveles, una solicitud de orden de cambio glossary-of-terms#Change_Order_Request .
- Para obtener más información, consulte ¿Cuáles son las diferentes configuraciones de niveles de órdenes de modificación en Project Financials?
- Dependiendo del ajuste de configuración del nivel de órdenes de cambio configurado para la herramienta de Contratos Primarios, las posibles órdenes de cambio pueden pasar a uno (1) de los siguientes elementos:
Requisitos
- La herramienta Eventos de cambio debe estar activada en el proyecto. Consulte Añadir y eliminar herramientas de proyecto.
- La configuración de órdenes de cambio de dos (2) niveles debe estar habilitada en la herramienta Contratos principales. Consulte Configurar el número de niveles de orden de cambio de contrato principal.
- El contrato principal del proyecto debe tener el estado "Aprobado". Consulte Aprobar un contrato principal.
Pasos
- Vaya a la herramienta Eventos de cambio del proyecto.
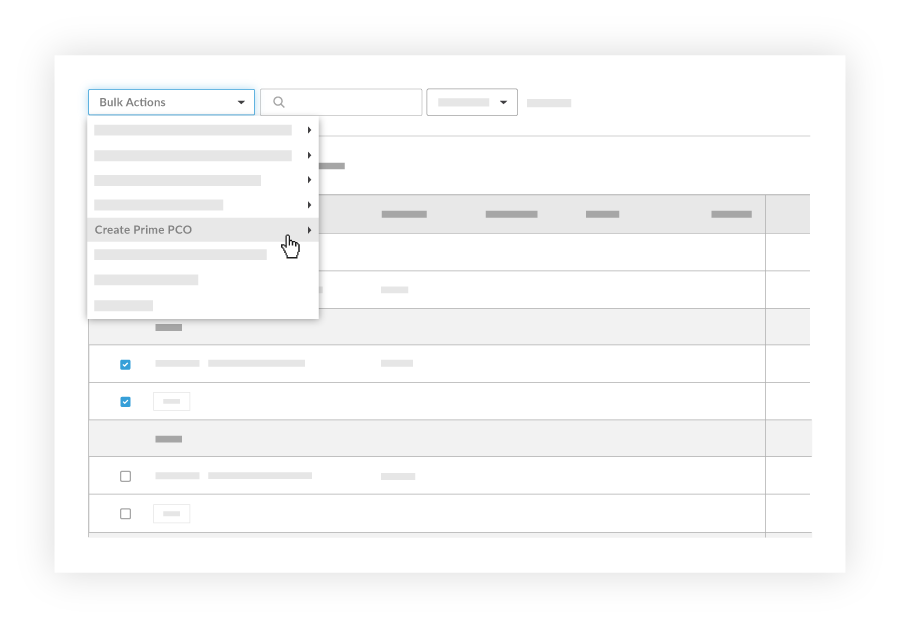
- En la tabla, marque las casillas de verificación de una (1) o más partidas de eventos de cambio para incluirlas en la nueva orden de cambio potencial.
Nota
Procore crea el desglose de partidas (DDP) de la orden de cambio potencial utilizando la(s) partida(s) de evento de cambio seleccionada(s). - Haga clic en el menú Acciones masivas y elija la opción Crear POC de contrato principal. A continuación, elija la opción de contrato adecuada en el submenú.
- En la página "Nueva Orden de Cambio Potencial", complete la siguiente entrada de datos:
-
Nota
Si la función de solicitud de presupuesto (RFQ) está activada, puede configurar la herramienta Eventos de cambio para que incluya todos los archivos adjuntos añadidos a la respuesta de RFQ de un revisor. Para obtener instrucciones, consulte Configurar ajustes: Cambiar Eventos.
- Haga clic en Crear.
Notas
- La lista desplegable Partida asociada sólo aparece si la cuenta Procore de su empresa está integrada con un sistema ERP integrado y la herramienta Contratos principales está activa en el proyecto.
- Al añadir partidas al desglose de valores de la orden de cambio, se debe seleccionar una partida asociada para cada partida nueva. Puede designar un (1) elemento de línea asociado o usar el mismo elemento de línea asociado para varios elementos de línea. Elegir crear una nueva partida para asociar creará automáticamente una nueva partida de cero (0) dólares en el SOV original del contrato.
Consulte también
- Añadir y eliminar herramientas en un proyecto
- ¿Cuáles son las diferentes configuraciones del nivel de órdenes de cambio en Project Financials?
- Configurar el número de niveles de orden de cambio de contrato principal
- Aprobar un contrato principal
- Establecer las configuraciones predeterminadas de gestión de cambios
If you would like to learn more about Procore's change events management software and how it can help your business, please visit our construction change order product page  .
.